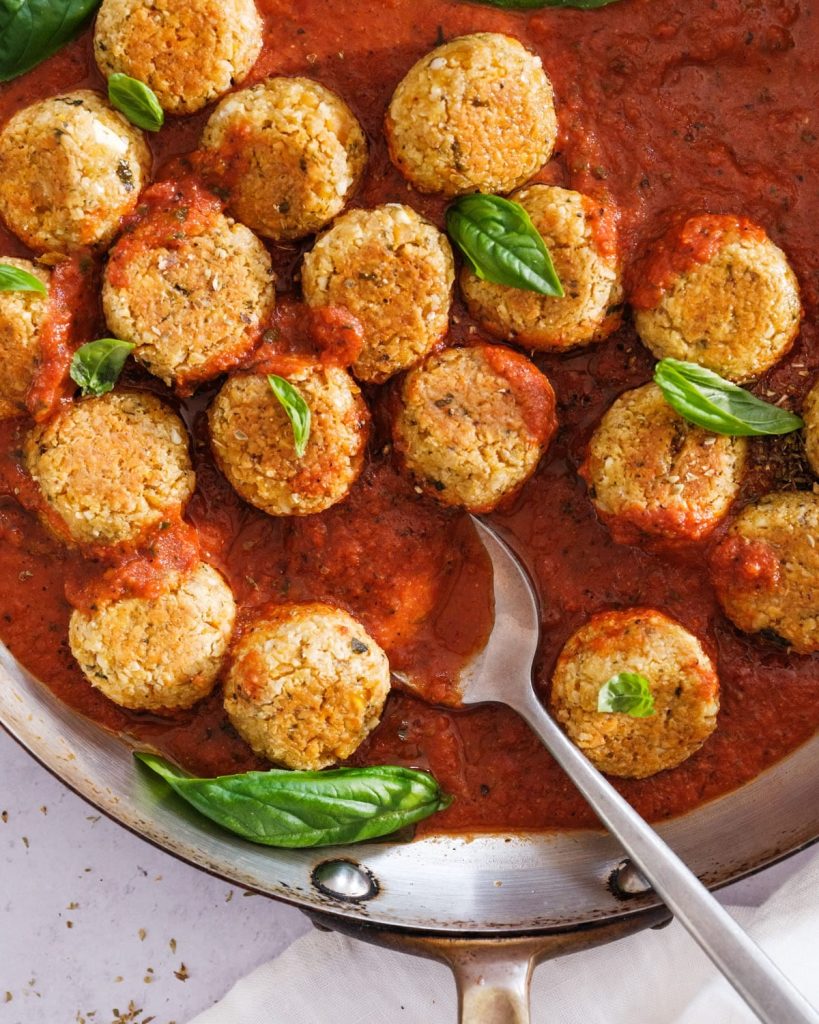
Easy and Tasty Vegetarian Meatballs Recipe
Recipes by Alex & Sonja
Introducing Alex & Sonja Overhiser, the incredible pair behind the beloved culinary blog, A Couple Cooks. As authors of cookbooks, busy parents, and a genuine couple who enjoys cooking together, Alex and Sonja have been sharing their food adventures with the audience since 2010. Their blog is filled with straightforward, seasonal recipes, tips for healthy meal planning, and a tribute to the joy of cooking.
The Overhisers’ cooking philosophy is based on simplicity and seasonality. They believe that cooking should be easy and fun, even for the most active families. Their recipes are crafted to be simple to execute, utilizing ingredients that are commonly available and in season. This not only guarantees freshness and taste but also promotes sustainable eating habits.
A standout feature of A Couple Cooks is that every recipe is written and photographed by Alex and Sonja themselves. This personal element brings authenticity and warmth to their content, making readers feel like part of the Overhiser clan. Each recipe is also tested on their two children, ensuring that the meals are family-friendly and appealing to individuals of all ages.
Alongside recipes, Alex and Sonja provide essential meal planning strategies. They recognize the difficulties of juggling a hectic lifestyle with healthy eating and offer practical insights on how to plan meals effectively. Their suggestions assist readers in saving time and minimizing stress, making it easier to relish home-cooked meals together as a family.
Through A Couple Cooks, Alex and Sonja have cultivated a community of culinary enthusiasts who share their love for cooking. Their blog serves not only as a compilation of recipes; it’s also a source of motivation and a reminder of the joy derived from preparing and sharing meals with loved ones.
Whether you’re an experienced cook or a novice in the kitchen, Recipes by Alex & Sonja provide something for everyone. Their dedication to simplicity, seasonality, and family-friendly cooking makes their blog an essential resource for anyone seeking to infuse more joy and deliciousness into their home cooking.
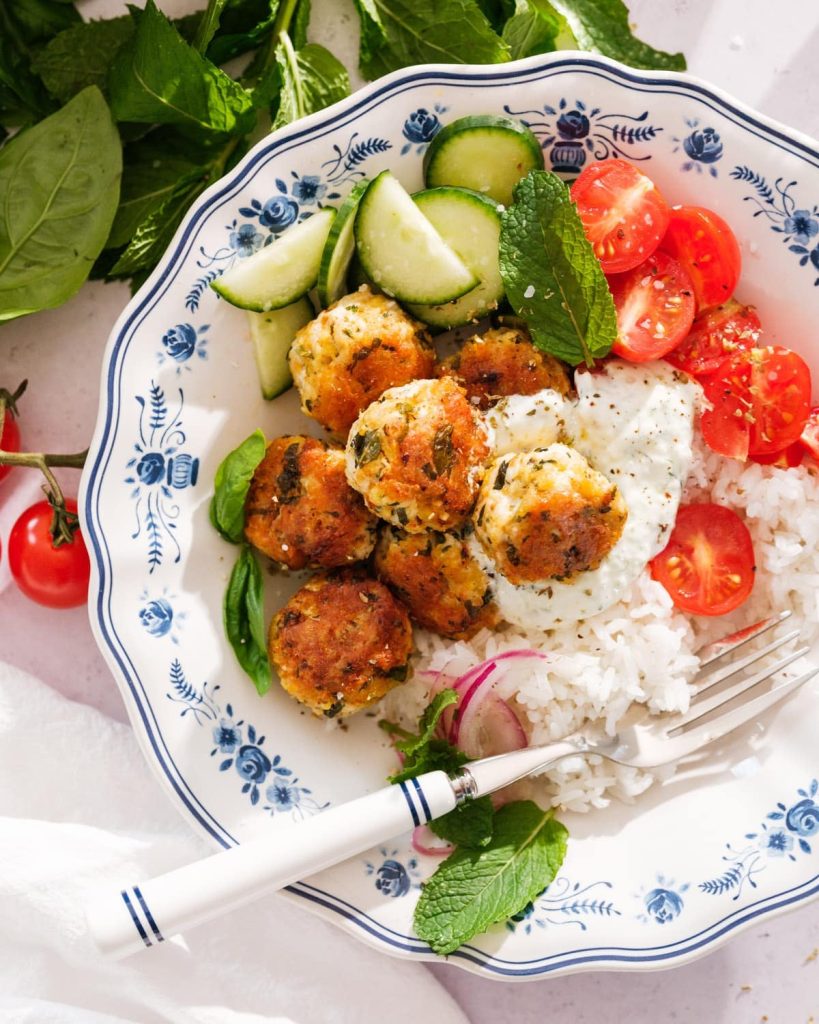
Greek-Style Chicken Meatballs Instructions
Recipes by Alex & Sonja
Introducing Alex and Sonja Overhiser, the energetic pair behind the well-known food blog “A Couple Cooks.” As authors of cookbooks, busy parents, and a couple in real life, Alex and Sonja have been expressing their zeal for cooking since 2010. Their blog serves as a goldmine of straightforward, seasonal recipes, insightful meal planning advice, and a celebration of the joy of cooking together as a family.
The culinary adventures of Alex and Sonja started with a mutual passion for crafting delectable dishes that are both healthy and easy to make. Their cooking philosophy highlights the importance of utilizing fresh, seasonal ingredients that not only elevate flavors but also encourage a healthy lifestyle. This mindset shines through in every dish they create, guaranteeing that each recipe is as nourishing as it is delicious.
A distinctive feature of Alex and Sonja’s recipes is that all are tested by their family, including their two children. This family-centric method assures that their meals are not only appealing to adults but also approved by kids, making them ideal for families eager to enjoy meals together.
The Overhisers’ blog showcases a vast selection of recipes, from speedy weeknight dinners to intricate weekend banquets. Whether you are an experienced chef or a beginner in the kitchen, you’ll discover something to spark your culinary creativity. Their recipes come with breathtaking photography, all taken by Alex and Sonja themselves, bringing each dish to life and offering a visual reference for home cooks.
Alongside recipes, Alex and Sonja provide essential meal planning suggestions that assist busy families in managing their cooking schedules. Their insights on efficiently organizing meals, sourcing ingredients, and preparing dishes ahead of time are invaluable for anyone wanting to make the most of their time in the kitchen without compromising on quality or nutrition.
Through “A Couple Cooks,” Alex and Sonja Overhiser have built a community of food enthusiasts who value the craft of cooking and the pleasure of sharing meals with family and friends. Their commitment to creating delicious, healthy recipes and their focus on family-friendly cooking make them a cherished resource for home cooks everywhere.
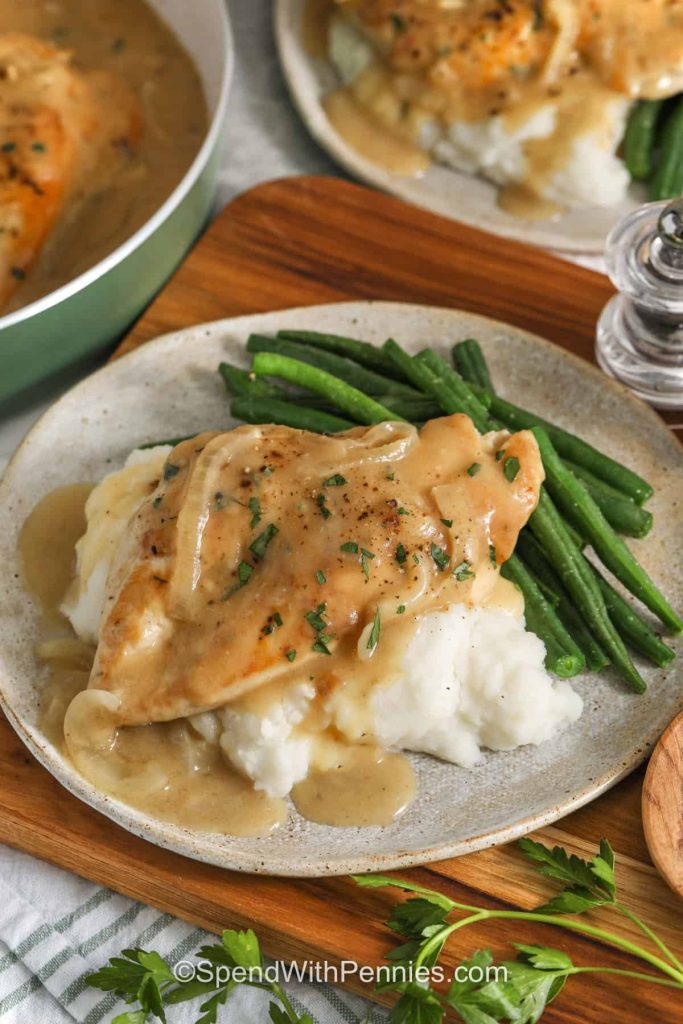
One-Pan Chicken Dinner Recipe with Tasty Gravy
### Smothered Chicken: A Classic Southern Delight
Smothered Chicken is a cherished dish inspired by Southern cuisine that captures both comfort and taste. This meal includes chicken breasts seasoned and cooked slowly in a luscious onion gravy, creating a satisfying dish ideal for family gatherings. The simplicity of one-pan cooking makes it both tasty and practical for hectic weeknights.
#### Holly’s Recipe Highlights: Smothered Chicken
– **Flavor**: Rich and comforting with tender seasoned chicken, sweet onions, and a savory herb-and-garlic gravy.
– **Why Make It**: Searing the chicken initially creates a delicious foundation, infusing the gravy with a deep, slow-simmered flavor in a shorter time.
– **Serving Suggestions**: Serve it over creamy mashed potatoes, fluffy rice, flaky biscuits, or buttery noodles to absorb the tasty onion gravy.
– **Total Time**: 26 Minutes
– **Serves**: 4
– **Cooking Method**: Stovetop
### Ingredient Notes
1. **Chicken Breasts**: Flattening the chicken to a consistent ½-inch thickness guarantees even cooking and a crispy golden crust. For added moisture, boneless skinless chicken thighs can be used as an alternative.
2. **Yellow Onion**: An excellent all-around option, yellow onions soften beautifully and bring a mild sweetness. Sweet onions can be swapped for a gentler taste, while white onions provide a sharper flavor.
3. **Garlic Powder, Sage, and Thyme**: This straightforward mix imparts warm, savory flavors to the poultry without lengthy cooking times. If desired, poultry seasoning can be used instead.
4. **Chicken Broth**: Both regular or low-sodium chicken broth are suitable; modify salt levels according to the broth chosen.
5. **Variations**: For a delightful twist, incorporate sliced mushrooms with the onions for a mushroom-onion gravy or mix in some heavy cream at the end for a rich creamy version.
### Cooking Tips
– **Pound the Chicken**: Guarantee uniform cooking by evenly pounding the chicken.
– **Utilize the Browned Bits**: When adding broth, scrape the browned bits from the pan to enhance flavor.
– **Gradually Add Broth**: Incorporate broth slowly to achieve a smooth gravy consistency.
– **Modify Gravy Thickness**: If the gravy turns out too thick, whisk in a little broth; if too thin, simmer uncovered for a few more minutes.
– **Verify Chicken Temperature**: Check that the chicken reaches 165°F at its thickest point.
### Saving Every Bite
Leftovers can be stored in a sealed container in the refrigerator for a maximum of 4 days or in the freezer for up to 3 months. Thaw overnight in the refrigerator and gently reheat on the stovetop or in the microwave, adding a splash of broth if the gravy has become thick.
### Cozy Chicken Dinners
Smothered Chicken is a dish that delivers warmth and contentment to any dinner table. Its deep flavors and comforting textures make it a favorite among families. Relish this charming recipe and enjoy every moment!

An All-Inclusive 7-Day Menu for a Protein-Rich Diet
**Title: An All-Encompassing 7-Day High-Protein Meal Schedule**
Beginning a high-protein diet can be an enlightening adventure for anyone aiming to gain muscle, shed pounds, or simply uphold a healthy lifestyle. Proteins are vital macronutrients that are instrumental in tissue development and repair, hormone and enzyme production, and promoting overall wellness. This 7-day meal schedule is crafted to supply you with an assortment of high-protein dishes that are both flavorful and nourishing.
**Day 1:**
– **Breakfast:** Scrambled eggs with spinach and feta cheese, accompanied by turkey bacon.
– **Lunch:** Grilled chicken salad featuring mixed greens, cherry tomatoes, cucumbers, and balsamic vinaigrette.
– **Dinner:** Baked salmon paired with quinoa and steamed broccoli.
– **Snack:** Greek yogurt topped with almonds and a drizzle of honey.
**Day 2:**
– **Breakfast:** Protein shake with banana, peanut butter, and whey protein powder.
– **Lunch:** Tuna salad including avocado, celery, and a dash of lemon juice, served on whole-grain bread.
– **Dinner:** Beef stir-fry incorporating bell peppers, onions, and snow peas, served over brown rice.
– **Snack:** Cottage cheese with sliced peaches.
**Day 3:**
– **Breakfast:** Overnight oats blended with chia seeds, protein powder, and mixed berries.
– **Lunch:** Turkey and cheese wrap featuring lettuce, tomato, and mustard in a whole-wheat tortilla.
– **Dinner:** Grilled shrimp skewers served alongside roasted sweet potatoes and asparagus.
– **Snack:** Hard-boiled eggs.
**Day 4:**
– **Breakfast:** Omelet made with mushrooms, bell peppers, and cheddar cheese.
– **Lunch:** Quinoa and black bean salad mixed with corn, cilantro, and lime dressing.
– **Dinner:** Pork chops accompanied by apple sauce and mashed cauliflower.
– **Snack:** Edamame sprinkled with sea salt.
**Day 5:**
– **Breakfast:** Whole-grain toast topped with avocado and poached eggs.
– **Lunch:** Lentil soup with carrots, celery, and diced tomatoes.
– **Dinner:** Grilled tilapia served with wild rice and sautéed spinach.
– **Snack:** Protein bar.
**Day 6:**
– **Breakfast:** Chia seed pudding made with almond milk, garnished with sliced almonds and strawberries.
– **Lunch:** Chicken Caesar salad with romaine lettuce, parmesan cheese, and croutons.
– **Dinner:** Lamb chops accompanied by mint yogurt sauce and roasted Brussels sprouts.
– **Snack:** Mixed nuts.
**Day 7:**
– **Breakfast:** Protein powder pancakes topped with fresh blueberries and a dollop of Greek yogurt.
– **Lunch:** Baked falafel served with a side of tabbouleh and hummus.
– **Dinner:** Grilled steak accompanied by baked sweet potato and green beans.
– **Snack:** Sliced turkey breast with cheese.
**Conclusion:**
This 7-day high-protein meal schedule presents a varied selection of dishes that accommodate different tastes and preferences while ensuring sufficient protein consumption. Stay well-hydrated and modify portion sizes to suit your individual dietary requirements and objectives. Always seek advice from a healthcare professional or nutritionist before undertaking significant dietary adjustments. Enjoy your path to a healthier, protein-enriched lifestyle!

22 Must-Try Summer Dessert Recipes
# My Favorite Summer Desserts for Lake Trips, Backyard Barbecues, and Family Gatherings
If your summer agenda is anything like mine, it’s packed with barbecues, lake trips, family gatherings, and those spur-of-the-moment texts asking, “Can you whip up a dessert?” Great news: this compilation of summer dessert recipes has got you sorted! These are the delightful treats I prepare each summer – simple, crowd-pleasing, and adored by everyone. Bars, pies, cookies, brownies, and so much more!
## Beloved Summer Dessert Recipes
### 1. [The Ultimate Peach Cobbler](https://pinchofyum.com/peach-cobbler)
The greatest summer dessert ever! Crafted with fresh peaches, sugar, and a topping that bakes like slightly undercooked cookie dough, with a crunchy sugar crust on top.
**Rating:** 4.7 (247 reviews)
### 2. [Top S’mores Bars](https://pinchofyum.com/smores-bars)
These truly are the TOP S’mores Bars! Chocolate, peanut butter, and marshmallow nestled between two layers of graham cracker crust. Everyone’s go-to summer treat (S’MORES, please!) transformed into dessert bar style!
**Rating:** 4.9 (136 reviews)
### 3. [Banoffee Tart](https://pinchofyum.com/banoffee-pie)
Without a doubt my new go-to dessert. Salty-sweet graham cracker crust, smooth caramel toffee filling, sliced bananas, and whipped cream on top. My family adores this simple dessert recipe!
**Rating:** 4.8 (55 reviews)
### 4. [Celebration Brownies](https://pinchofyum.com/party-brownies)
Brownies adorned with a generous layer of fudge frosting and colorful sprinkles. The ideal way to elevate a box of brownie mix!
**Rating:** 4.9 (19 reviews)
### 5. [Gigantic Strawberry White Chocolate Cookies](https://pinchofyum.com/strawberry-white-chocolate-cookies)
These are GIGANTIC Strawberry White Chocolate Cookies dotted with rich and creamy white chocolate chips, beautifully complemented by tart freeze-dried strawberries.
**Rating:** 4.8 (452 reviews)
### 6. [Salted Caramel Rice Treats](https://pinchofyum.com/salted-caramel-rice-krispie-bars)
Remarkably chewy, crispy, caramel-flavored, buttery, soft, and perfectly indulgent as you desire them to be.
**Rating:** 4.8 (21 reviews)
### 7. [Superb Puppy Chow](https://pinchofyum.com/extra-good-puppy-chow)
Stunning, chunky clusters of puppy chow with extra chocolate and peanut butter, dusted in powdered sugar! A taste of Midwest summer joy.
**Rating:** 5.0 (26 reviews)
### 8. [Fruit Tart](https://pinchofyum.com/fruit-pizza)
This delightful fruit tart is both beautiful and tasty! A tender sugar cookie base with cream cheese frosting and topped with sliced fruits.
**Rating:** 4.8 (70 reviews)
### 9. [Pistachio Bread](https://pinchofyum.com/pistachio-loaf)
Gather your baking staples – like butter, eggs, and sugar – alongside a few additional ingredients, like pistachios and coconut flour, and start baking!
**Rating:** 4.8 (435 reviews)
### 10. [The Easiest Peanut Butter Pie](https://pinchofyum.com/the-best-easy-peanut-butter-pie)
A straightforward cookie crust topped with a layer of airy peanut butter filling that is fluffy, light, and remarkably rich simultaneously.
**Rating:** 4.8 (38 reviews)
### 11. [Almond Butter Zucchini Chocolate Chip Bars](https://pinchofyum.com/almond-butter-chocolate-chip-zucchini-bars)
These bars are nutritious and fantastic, made with oats, almond butter, zucchini, dates, and maple syrup.
**Rating:** 4.9 (32 reviews)
### 12. [Simple Homemade Blueberry Compote](https://pinchofyum.com/easy-homemade-blueberry-sauce)
This straightforward blueberry compote is crafted with fresh blueberries, sugar, vanilla, and cornstarch. Thick, sweet, and ideal for pancakes.
**Rating:** 4.8 (66 reviews)
### 13. [Classic Homemade Oreos](https://pinchofyum.com/old-school-homemade-oreos)
Transformational Homemade Oreos that are soft, buttery, moist, perfectly dense chocolate cookies filled with cream cheese frosting.
**Rating:** 5.0 (7 reviews)

Easy and Tasty Vegetarian Meatballs Recipe
Recipes by Alex & Sonja
Introducing Alex & Sonja Overhiser, the incredible pair behind the beloved culinary blog, A Couple Cooks. As authors of cookbooks, busy parents, and a genuine couple who enjoys cooking together, Alex and Sonja have been sharing their food adventures with the audience since 2010. Their blog is filled with straightforward, seasonal recipes, tips for healthy meal planning, and a tribute to the joy of cooking.
The Overhisers’ cooking philosophy is based on simplicity and seasonality. They believe that cooking should be easy and fun, even for the most active families. Their recipes are crafted to be simple to execute, utilizing ingredients that are commonly available and in season. This not only guarantees freshness and taste but also promotes sustainable eating habits.
A standout feature of A Couple Cooks is that every recipe is written and photographed by Alex and Sonja themselves. This personal element brings authenticity and warmth to their content, making readers feel like part of the Overhiser clan. Each recipe is also tested on their two children, ensuring that the meals are family-friendly and appealing to individuals of all ages.
Alongside recipes, Alex and Sonja provide essential meal planning strategies. They recognize the difficulties of juggling a hectic lifestyle with healthy eating and offer practical insights on how to plan meals effectively. Their suggestions assist readers in saving time and minimizing stress, making it easier to relish home-cooked meals together as a family.
Through A Couple Cooks, Alex and Sonja have cultivated a community of culinary enthusiasts who share their love for cooking. Their blog serves not only as a compilation of recipes; it’s also a source of motivation and a reminder of the joy derived from preparing and sharing meals with loved ones.
Whether you’re an experienced cook or a novice in the kitchen, Recipes by Alex & Sonja provide something for everyone. Their dedication to simplicity, seasonality, and family-friendly cooking makes their blog an essential resource for anyone seeking to infuse more joy and deliciousness into their home cooking.
Read More
Greek-Style Chicken Meatballs Instructions
Recipes by Alex & Sonja
Introducing Alex and Sonja Overhiser, the energetic pair behind the well-known food blog “A Couple Cooks.” As authors of cookbooks, busy parents, and a couple in real life, Alex and Sonja have been expressing their zeal for cooking since 2010. Their blog serves as a goldmine of straightforward, seasonal recipes, insightful meal planning advice, and a celebration of the joy of cooking together as a family.
The culinary adventures of Alex and Sonja started with a mutual passion for crafting delectable dishes that are both healthy and easy to make. Their cooking philosophy highlights the importance of utilizing fresh, seasonal ingredients that not only elevate flavors but also encourage a healthy lifestyle. This mindset shines through in every dish they create, guaranteeing that each recipe is as nourishing as it is delicious.
A distinctive feature of Alex and Sonja’s recipes is that all are tested by their family, including their two children. This family-centric method assures that their meals are not only appealing to adults but also approved by kids, making them ideal for families eager to enjoy meals together.
The Overhisers’ blog showcases a vast selection of recipes, from speedy weeknight dinners to intricate weekend banquets. Whether you are an experienced chef or a beginner in the kitchen, you’ll discover something to spark your culinary creativity. Their recipes come with breathtaking photography, all taken by Alex and Sonja themselves, bringing each dish to life and offering a visual reference for home cooks.
Alongside recipes, Alex and Sonja provide essential meal planning suggestions that assist busy families in managing their cooking schedules. Their insights on efficiently organizing meals, sourcing ingredients, and preparing dishes ahead of time are invaluable for anyone wanting to make the most of their time in the kitchen without compromising on quality or nutrition.
Through “A Couple Cooks,” Alex and Sonja Overhiser have built a community of food enthusiasts who value the craft of cooking and the pleasure of sharing meals with family and friends. Their commitment to creating delicious, healthy recipes and their focus on family-friendly cooking make them a cherished resource for home cooks everywhere.
Read More
One-Pan Chicken Dinner Recipe with Tasty Gravy
### Smothered Chicken: A Classic Southern Delight
Smothered Chicken is a cherished dish inspired by Southern cuisine that captures both comfort and taste. This meal includes chicken breasts seasoned and cooked slowly in a luscious onion gravy, creating a satisfying dish ideal for family gatherings. The simplicity of one-pan cooking makes it both tasty and practical for hectic weeknights.
#### Holly’s Recipe Highlights: Smothered Chicken
– **Flavor**: Rich and comforting with tender seasoned chicken, sweet onions, and a savory herb-and-garlic gravy.
– **Why Make It**: Searing the chicken initially creates a delicious foundation, infusing the gravy with a deep, slow-simmered flavor in a shorter time.
– **Serving Suggestions**: Serve it over creamy mashed potatoes, fluffy rice, flaky biscuits, or buttery noodles to absorb the tasty onion gravy.
– **Total Time**: 26 Minutes
– **Serves**: 4
– **Cooking Method**: Stovetop
### Ingredient Notes
1. **Chicken Breasts**: Flattening the chicken to a consistent ½-inch thickness guarantees even cooking and a crispy golden crust. For added moisture, boneless skinless chicken thighs can be used as an alternative.
2. **Yellow Onion**: An excellent all-around option, yellow onions soften beautifully and bring a mild sweetness. Sweet onions can be swapped for a gentler taste, while white onions provide a sharper flavor.
3. **Garlic Powder, Sage, and Thyme**: This straightforward mix imparts warm, savory flavors to the poultry without lengthy cooking times. If desired, poultry seasoning can be used instead.
4. **Chicken Broth**: Both regular or low-sodium chicken broth are suitable; modify salt levels according to the broth chosen.
5. **Variations**: For a delightful twist, incorporate sliced mushrooms with the onions for a mushroom-onion gravy or mix in some heavy cream at the end for a rich creamy version.
### Cooking Tips
– **Pound the Chicken**: Guarantee uniform cooking by evenly pounding the chicken.
– **Utilize the Browned Bits**: When adding broth, scrape the browned bits from the pan to enhance flavor.
– **Gradually Add Broth**: Incorporate broth slowly to achieve a smooth gravy consistency.
– **Modify Gravy Thickness**: If the gravy turns out too thick, whisk in a little broth; if too thin, simmer uncovered for a few more minutes.
– **Verify Chicken Temperature**: Check that the chicken reaches 165°F at its thickest point.
### Saving Every Bite
Leftovers can be stored in a sealed container in the refrigerator for a maximum of 4 days or in the freezer for up to 3 months. Thaw overnight in the refrigerator and gently reheat on the stovetop or in the microwave, adding a splash of broth if the gravy has become thick.
### Cozy Chicken Dinners
Smothered Chicken is a dish that delivers warmth and contentment to any dinner table. Its deep flavors and comforting textures make it a favorite among families. Relish this charming recipe and enjoy every moment!
Read More
An All-Inclusive 7-Day Menu for a Protein-Rich Diet
**Title: An All-Encompassing 7-Day High-Protein Meal Schedule**
Beginning a high-protein diet can be an enlightening adventure for anyone aiming to gain muscle, shed pounds, or simply uphold a healthy lifestyle. Proteins are vital macronutrients that are instrumental in tissue development and repair, hormone and enzyme production, and promoting overall wellness. This 7-day meal schedule is crafted to supply you with an assortment of high-protein dishes that are both flavorful and nourishing.
**Day 1:**
– **Breakfast:** Scrambled eggs with spinach and feta cheese, accompanied by turkey bacon.
– **Lunch:** Grilled chicken salad featuring mixed greens, cherry tomatoes, cucumbers, and balsamic vinaigrette.
– **Dinner:** Baked salmon paired with quinoa and steamed broccoli.
– **Snack:** Greek yogurt topped with almonds and a drizzle of honey.
**Day 2:**
– **Breakfast:** Protein shake with banana, peanut butter, and whey protein powder.
– **Lunch:** Tuna salad including avocado, celery, and a dash of lemon juice, served on whole-grain bread.
– **Dinner:** Beef stir-fry incorporating bell peppers, onions, and snow peas, served over brown rice.
– **Snack:** Cottage cheese with sliced peaches.
**Day 3:**
– **Breakfast:** Overnight oats blended with chia seeds, protein powder, and mixed berries.
– **Lunch:** Turkey and cheese wrap featuring lettuce, tomato, and mustard in a whole-wheat tortilla.
– **Dinner:** Grilled shrimp skewers served alongside roasted sweet potatoes and asparagus.
– **Snack:** Hard-boiled eggs.
**Day 4:**
– **Breakfast:** Omelet made with mushrooms, bell peppers, and cheddar cheese.
– **Lunch:** Quinoa and black bean salad mixed with corn, cilantro, and lime dressing.
– **Dinner:** Pork chops accompanied by apple sauce and mashed cauliflower.
– **Snack:** Edamame sprinkled with sea salt.
**Day 5:**
– **Breakfast:** Whole-grain toast topped with avocado and poached eggs.
– **Lunch:** Lentil soup with carrots, celery, and diced tomatoes.
– **Dinner:** Grilled tilapia served with wild rice and sautéed spinach.
– **Snack:** Protein bar.
**Day 6:**
– **Breakfast:** Chia seed pudding made with almond milk, garnished with sliced almonds and strawberries.
– **Lunch:** Chicken Caesar salad with romaine lettuce, parmesan cheese, and croutons.
– **Dinner:** Lamb chops accompanied by mint yogurt sauce and roasted Brussels sprouts.
– **Snack:** Mixed nuts.
**Day 7:**
– **Breakfast:** Protein powder pancakes topped with fresh blueberries and a dollop of Greek yogurt.
– **Lunch:** Baked falafel served with a side of tabbouleh and hummus.
– **Dinner:** Grilled steak accompanied by baked sweet potato and green beans.
– **Snack:** Sliced turkey breast with cheese.
**Conclusion:**
This 7-day high-protein meal schedule presents a varied selection of dishes that accommodate different tastes and preferences while ensuring sufficient protein consumption. Stay well-hydrated and modify portion sizes to suit your individual dietary requirements and objectives. Always seek advice from a healthcare professional or nutritionist before undertaking significant dietary adjustments. Enjoy your path to a healthier, protein-enriched lifestyle!
Read More
22 Must-Try Summer Dessert Recipes
# My Favorite Summer Desserts for Lake Trips, Backyard Barbecues, and Family Gatherings
If your summer agenda is anything like mine, it’s packed with barbecues, lake trips, family gatherings, and those spur-of-the-moment texts asking, “Can you whip up a dessert?” Great news: this compilation of summer dessert recipes has got you sorted! These are the delightful treats I prepare each summer – simple, crowd-pleasing, and adored by everyone. Bars, pies, cookies, brownies, and so much more!
## Beloved Summer Dessert Recipes
### 1. [The Ultimate Peach Cobbler](https://pinchofyum.com/peach-cobbler)
The greatest summer dessert ever! Crafted with fresh peaches, sugar, and a topping that bakes like slightly undercooked cookie dough, with a crunchy sugar crust on top.
**Rating:** 4.7 (247 reviews)
### 2. [Top S’mores Bars](https://pinchofyum.com/smores-bars)
These truly are the TOP S’mores Bars! Chocolate, peanut butter, and marshmallow nestled between two layers of graham cracker crust. Everyone’s go-to summer treat (S’MORES, please!) transformed into dessert bar style!
**Rating:** 4.9 (136 reviews)
### 3. [Banoffee Tart](https://pinchofyum.com/banoffee-pie)
Without a doubt my new go-to dessert. Salty-sweet graham cracker crust, smooth caramel toffee filling, sliced bananas, and whipped cream on top. My family adores this simple dessert recipe!
**Rating:** 4.8 (55 reviews)
### 4. [Celebration Brownies](https://pinchofyum.com/party-brownies)
Brownies adorned with a generous layer of fudge frosting and colorful sprinkles. The ideal way to elevate a box of brownie mix!
**Rating:** 4.9 (19 reviews)
### 5. [Gigantic Strawberry White Chocolate Cookies](https://pinchofyum.com/strawberry-white-chocolate-cookies)
These are GIGANTIC Strawberry White Chocolate Cookies dotted with rich and creamy white chocolate chips, beautifully complemented by tart freeze-dried strawberries.
**Rating:** 4.8 (452 reviews)
### 6. [Salted Caramel Rice Treats](https://pinchofyum.com/salted-caramel-rice-krispie-bars)
Remarkably chewy, crispy, caramel-flavored, buttery, soft, and perfectly indulgent as you desire them to be.
**Rating:** 4.8 (21 reviews)
### 7. [Superb Puppy Chow](https://pinchofyum.com/extra-good-puppy-chow)
Stunning, chunky clusters of puppy chow with extra chocolate and peanut butter, dusted in powdered sugar! A taste of Midwest summer joy.
**Rating:** 5.0 (26 reviews)
### 8. [Fruit Tart](https://pinchofyum.com/fruit-pizza)
This delightful fruit tart is both beautiful and tasty! A tender sugar cookie base with cream cheese frosting and topped with sliced fruits.
**Rating:** 4.8 (70 reviews)
### 9. [Pistachio Bread](https://pinchofyum.com/pistachio-loaf)
Gather your baking staples – like butter, eggs, and sugar – alongside a few additional ingredients, like pistachios and coconut flour, and start baking!
**Rating:** 4.8 (435 reviews)
### 10. [The Easiest Peanut Butter Pie](https://pinchofyum.com/the-best-easy-peanut-butter-pie)
A straightforward cookie crust topped with a layer of airy peanut butter filling that is fluffy, light, and remarkably rich simultaneously.
**Rating:** 4.8 (38 reviews)
### 11. [Almond Butter Zucchini Chocolate Chip Bars](https://pinchofyum.com/almond-butter-chocolate-chip-zucchini-bars)
These bars are nutritious and fantastic, made with oats, almond butter, zucchini, dates, and maple syrup.
**Rating:** 4.9 (32 reviews)
### 12. [Simple Homemade Blueberry Compote](https://pinchofyum.com/easy-homemade-blueberry-sauce)
This straightforward blueberry compote is crafted with fresh blueberries, sugar, vanilla, and cornstarch. Thick, sweet, and ideal for pancakes.
**Rating:** 4.8 (66 reviews)
### 13. [Classic Homemade Oreos](https://pinchofyum.com/old-school-homemade-oreos)
Transformational Homemade Oreos that are soft, buttery, moist, perfectly dense chocolate cookies filled with cream cheese frosting.
**Rating:** 5.0 (7 reviews)

Peach Margarita Recipe: A Cool Beverage with Fresh Peaches
# Fall in Love with This Playful and Fruity Peach Margarita
This Peach Margarita recipe offers a vibrant and fruity take on the traditional margarita, crafted with fresh peach puree, zesty lime juice, and smooth tequila. It’s sweet, tangy, and invigorating, making it an ideal choice for summer gatherings, backyard barbecues, or unwinding on a warm evening.
## Recipe Ingredients
– **Tequila** – The primary spirit in this cocktail.
– **Cointreau** – An orange liqueur to add a hint of citrus. Alternatively, triple sec can be used if you prefer.
– **Peach Puree** – Created from fresh, ripe peaches.
For a complete list of ingredients and their amounts, refer to the recipe card below.
## How to Create a Peach Margarita
**Step #1:** Peel and chop your peaches, then place them into a blender or food processor.
**Step #2:** Blend the peaches until they’ve reached a smooth consistency. If necessary, incorporate a splash of water to assist in blending.
**Step #3:** Strain the peach puree into a glass and set it aside.
**Step #4:** Fill a cocktail shaker with ice, tequila, Cointreau, peach puree, lime juice, and honey.
**Step #5:** Shake vigorously for 30 seconds.
**Step #6:** Pour into your preferred margarita glass and savor!
## FAQs
**What kind of tequila should I choose for this Peach Margarita?**
I suggest opting for blanco, commonly known as silver tequila. Reposado tequila or even añejo tequila are also good choices if you prefer!
**How can I adorn the rim of my peach margaritas?**
I suggest using sugar, salt, or even tajin on the rim of your margarita glass. I personally like to embellish this cocktail with a fresh peach slice and place it alongside the rimmed glass.
**Is it possible to use frozen peaches instead of fresh peaches?**
Absolutely! Just thaw the peaches to room temperature, discard any excess liquid, and blend them to create the puree.
## Storage Information
You can **store** any remaining peach margarita in an airtight container in your fridge for 1-2 days.
## More Cocktails to Savor
For additional fruity margarita recipes, explore my Watermelon Margarita, Pineapple Margarita, and Orange Margarita.
—
Enjoy Responsibly. This post and recipe are meant for individuals of legal drinking age.
Read More
Salad featuring Watermelon and Feta Cheese
Recipes from Alex & Sonja
Introducing Alex and Sonja Overhiser, the enthusiastic pair behind the beloved food blog, A Couple Cooks. As authors of cookbooks, busy parents, and a real-life couple, they have perfected the skill of crafting straightforward, seasonal recipes that enhance the joy of cooking. Since the inception of their blog in 2010, Alex and Sonja have committed themselves to sharing their love for culinary arts with everyone.
Their journey started with the goal of making healthy eating both simple and enjoyable for all. By concentrating on fresh, nutritious ingredients, they create recipes that are not only scrumptious but also effortless to make. From colorful salads to filling main courses, their culinary creations are intended to satisfy a wide range of palates and dietary needs.
A distinctive feature of A Couple Cooks is the personal touch that Alex and Sonja infuse into every recipe. Each dish is carefully composed and photographed by the couple, making certain that readers receive thorough instructions and visual encouragement. Moreover, all recipes are tested by their two children, adding an extra dimension of authenticity and family-friendliness to their contributions.
In addition to recipes, Alex and Sonja offer useful meal planning advice to assist busy families in integrating healthy eating into their everyday lives. Their blog serves as a valuable resource, featuring meal prep guides, grocery lists, and efficient cooking strategies.
Whether you are an experienced cook or just starting out, A Couple Cooks has something for everybody. With their friendly approach and sincere passion for food, Alex and Sonja welcome you to embark on a culinary journey that embraces the pleasure of cooking together.
Read More
Salad with Grilled Corn
Recipes from Alex & Sonja
Introducing Alex and Sonja Overhiser, the talented pair behind the widely-loved food blog, A Couple Cooks. As authors of cookbooks, active parents, and a real-life couple, they have been showcasing their culinary adventures to the world since 2010. Their blog is filled with simple, seasonal recipes, healthy meal planning advice, and an infectious passion for cooking that connects with food lovers everywhere.
Alex and Sonja’s cooking philosophy is based on the idea that preparing food should be approachable, enjoyable, and healthful. They concentrate on crafting recipes that are not only tasty but also straightforward to make, ideal for busy families and individuals eager to include more nutritious meals in their diets. Their cooking style highlights fresh, seasonal ingredients, letting the natural tastes of the food stand out.
Every recipe on A Couple Cooks is carefully created and tested in their own kitchen, often with assistance from their two young kids. This hands-on method guarantees that each dish is family-friendly and appropriate for cooks of all experience levels. From filling breakfasts and colorful salads to comforting dinners and indulgent desserts, Alex and Sonja provide a wide variety of recipes that appeal to many tastes and dietary needs.
Besides their recipes, Alex and Sonja offer helpful meal planning strategies that assist readers in streamlining their cooking habits and maximizing their time in the kitchen. Their blog serves as a valuable resource for anyone wanting to simplify meal preparation, minimize food waste, and savor more home-cooked meals with family and friends.
With their beautiful photography and compelling storytelling, Alex and Sonja welcome readers into their culinary space, motivating them to discover the joy of cooking and the happiness of sharing a meal with family and friends. Whether you are an experienced cook or just embarking on your culinary adventure, A Couple Cooks provides a wealth of inspiration and practical tips to help you prepare delectable, healthy meals at home.
Read More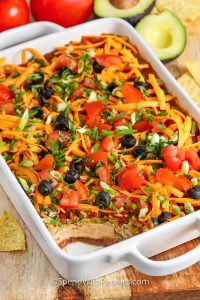
The Most Loved Creamy Dip at Gatherings
# 7 Layer Dip: The Ultimate Party Appetizer
This 7 Layer Dip steals the show at gatherings, filled with creamy, cheesy, zesty layers that vanish quickly as soon as the chips are served. Simple to prepare in advance and bursting with Tex-Mex taste, it’s the ideal appetizer for potlucks and family events.
## Holly’s Recipe Highlights: 7 Layer Dip
– **Flavor**: This dip features a creamy, cheesy texture, loaded with bold taco taste, including fresh guacamole, salsa, and crunchy toppings in each mouthful.
– **Time-Saving Tip**: Opt for store-bought guacamole, pre-shredded cheese, and sliced canned olives to minimize prep time and speed up the dip assembly.
– **Serving Suggestions**: I prefer to finish my 7-layer dip with black olives for a traditional flavor, but diced tomatoes like pico de gallo provide a vibrant, juicy contrast that’s equally tasty.
**Total Time**: 1 Hour 15 Mins (Only 15 Mins Prep!)
**Servings**: 16, ideal for entertaining!
## Ingredient Notes
– **Salsa**: Make sure to drain it thoroughly before layering to maintain the dip’s thickness, neatness, and ease of scooping. The drained liquid can be mixed into the refried beans for added flavor and a smoother texture.
– **Refried Beans**: Canned refried beans offer a robust, flavorful foundation that stabilizes all the layers. Both regular and fat-free refried beans work well in this dish.
– **Milk**: A dash of milk assists in thinning the refried beans for smooth and even spreading. For enhanced flavor, utilize the reserved salsa liquid instead.
– **Cream Cheese**: Softened cream cheese combines seamlessly with sour cream and taco seasoning, forming a rich, creamy layer that maintains its form and simplifies scooping.
– **Sour Cream**: Contributes a creamy consistency and zesty flavor while lightening the cream cheese layer. Greek yogurt can serve as a thicker, somewhat tangier alternative.
– **Cheddar Cheese**: Sharp cheddar provides a robust, traditional flavor and a delightful cheesy finish. Monterey Jack, pepper jack, or a Mexican cheese blend can add a different twist.
– **Black Olives or Tomatoes**: Black olives impart a salty, traditional flavor, while diced tomatoes add a fresh, juicy element. Choose one or both based on your taste preference.
## Delicious Variations
– **Spicy 7 Layer Dip**: Incorporate sliced jalapeños, hot salsa, or pepper jack cheese.
– **Extra Fresh**: Garnish with diced tomatoes, shredded lettuce, cilantro, and a squeeze of lime just before serving.
– **Meaty Version**: Include a cooled layer of taco-seasoned ground beef between the beans and cream cheese layer.
## Tips for Perfecting Your Dip
– **Drain the Salsa First**: This is the best technique for preventing the dip from becoming watery.
– **Soften the Cream Cheese**: Ensures the creamy taco layer mixes smoothly without any lumps.
– **Use a Hand Mixer**: A hand mixer can make the cream cheese layer airy and easier to spread.
– **Spread the Guacamole Gently**: To avoid disturbing the cream cheese layer below.
– **Serve in a Clear Dish**: Great for gatherings, exposing the colorful layers.
– **Add Fresh Toppings**: Do this right before serving if preparing the dip a day in advance.
– **Choose Sturdy Tortilla Chips**: Delicate chips may crumble in the denser bean and cream cheese layers.
## Storing the Scoops
– **Storing**: Preserve in an airtight container in the refrigerator for up to 4 days.
– **Serving**: Some liquid may separate as it settles, particularly from the salsa and guacamole, so drain any excess before serving leftovers. This dip is best enjoyed cold and doesn’t require reheating.
– **For Make-Ahead Prep**: Prepare the dip up to 1 day prior. Add green onions, cilantro, tomatoes, or other fresh toppings just before serving for optimal texture.
*Freezing this dip is not advisable, as it will turn watery upon thawing.*
## Easy Party Dips
Did you like this 7 Layer Dip? Share your thoughts and rating below.
Read More
Vegan Taco Salad featuring Sweet Potatoes and Chickpeas
### Vegan Sweet Potato Chickpea Taco Salad
If you’re a fan of the Sweet Potato Chickpea Tacos, you’ll love this Vegan Sweet Potato Chickpea Taco Salad! This meal features fresh kale and romaine, crispy tortilla chips, smoky roasted chickpeas, and sweet potatoes, all topped with a creamy jalapeño dressing. It’s a meal full of flavor that can be whipped up in just 30 minutes, making it ideal for a weeknight supper.
#### Ingredients
– **For the Salad:**
– 2 medium sweet potatoes, diced into half-inch cubes
– 1 (15 oz.) can chickpeas, drained and rinsed
– 2 Tbsp avocado oil (plus extra for massaging kale)
– 1 tsp smoked paprika
– 1 tsp chili powder
– 3/4 tsp sea salt
– 1 small bunch lacinato kale, washed and chopped
– 1 head romaine lettuce, washed and chopped
– 2 cups tortilla chips, crushed into bite-sized pieces
– 1 large avocado, sliced (optional)
– **For the Dressing:**
– 3/4 cup Cheesy Jalapeño Cashew Dressing (link to recipe)
#### Instructions
1. **Preheat the Oven:** Set your oven to 425°F (218°C) and prepare a large baking sheet with parchment paper.
2. **Roast Sweet Potatoes and Chickpeas:** Spread the diced sweet potatoes and chickpeas on the baking sheet. Drizzle with avocado oil, smoked paprika, chili powder, and sea salt. Bake for 20-25 minutes, stirring halfway through, until the sweet potatoes are tender.
3. **Prepare the Dressing:** While the sweet potatoes and chickpeas are in the oven, make the Cheesy Jalapeño Cashew Dressing and set it aside.
4. **Massage the Kale:** In a sizable mixing bowl, place the chopped kale and gently massage it with a bit of oil to enhance tenderness. Add the chopped romaine and mix well.
5. **Combine Ingredients:** After the sweet potatoes and chickpeas are roasted, set aside 1/4 of them for serving. Add the remaining roasted items to the lettuce and kale mix, and toss with 3/4 cup of the dressing. Adjust the dressing according to your taste.
6. **Serve:** Move the salad to a serving plate, top with the reserved sweet potatoes and chickpeas, and sprinkle with crushed tortilla chips and sliced avocado if you like. Enjoy right away for the best flavor and texture.
#### Nutritional Information (per serving)
– **Calories:** 442
– **Carbohydrates:** 58.7 g
– **Protein:** 12.6 g
– **Fat:** 19.4 g
– **Saturated Fat:** 2.6 g
– **Cholesterol:** 0 mg
– **Sodium:** 967 mg
– **Potassium:** 902 mg
– **Fiber:** 11.9 g
– **Sugar:** 10.3 g
– **Vitamin A:** 4020 IU
– **Vitamin C:** 24 mg
– **Calcium:** 142 mg
– **Iron:** 4 mg
#### Conclusion
This Vegan Sweet Potato Chickpea Taco Salad is not only tasty but also nourishing and filling. It can be enjoyed as a complete meal or alongside other Mexican-inspired dishes. Give it a go and let us know how it turns out!
Read More